Using a Tablet or iPad for SOLIDWORKS Part 3
Hello Everyone!
This is Part 3 in my series on Using Solidworks on an iPad.
Please check out Parts 1 and 2 in this series:
Part 1: https://www.cati.com/blog/2020/08/using-a-tablet-or-ipad-for-solidworks/
Part 2: https://www.cati.com/blog/2020/11/using-a-tablet-or-ipad-for-solidworks-part-2/
In this blog I will discuss some of the differences that you may bump into when using SOLIDWORKS on your iPad. I will also provide some guidance and tips to make your transition to an iPad smoother.
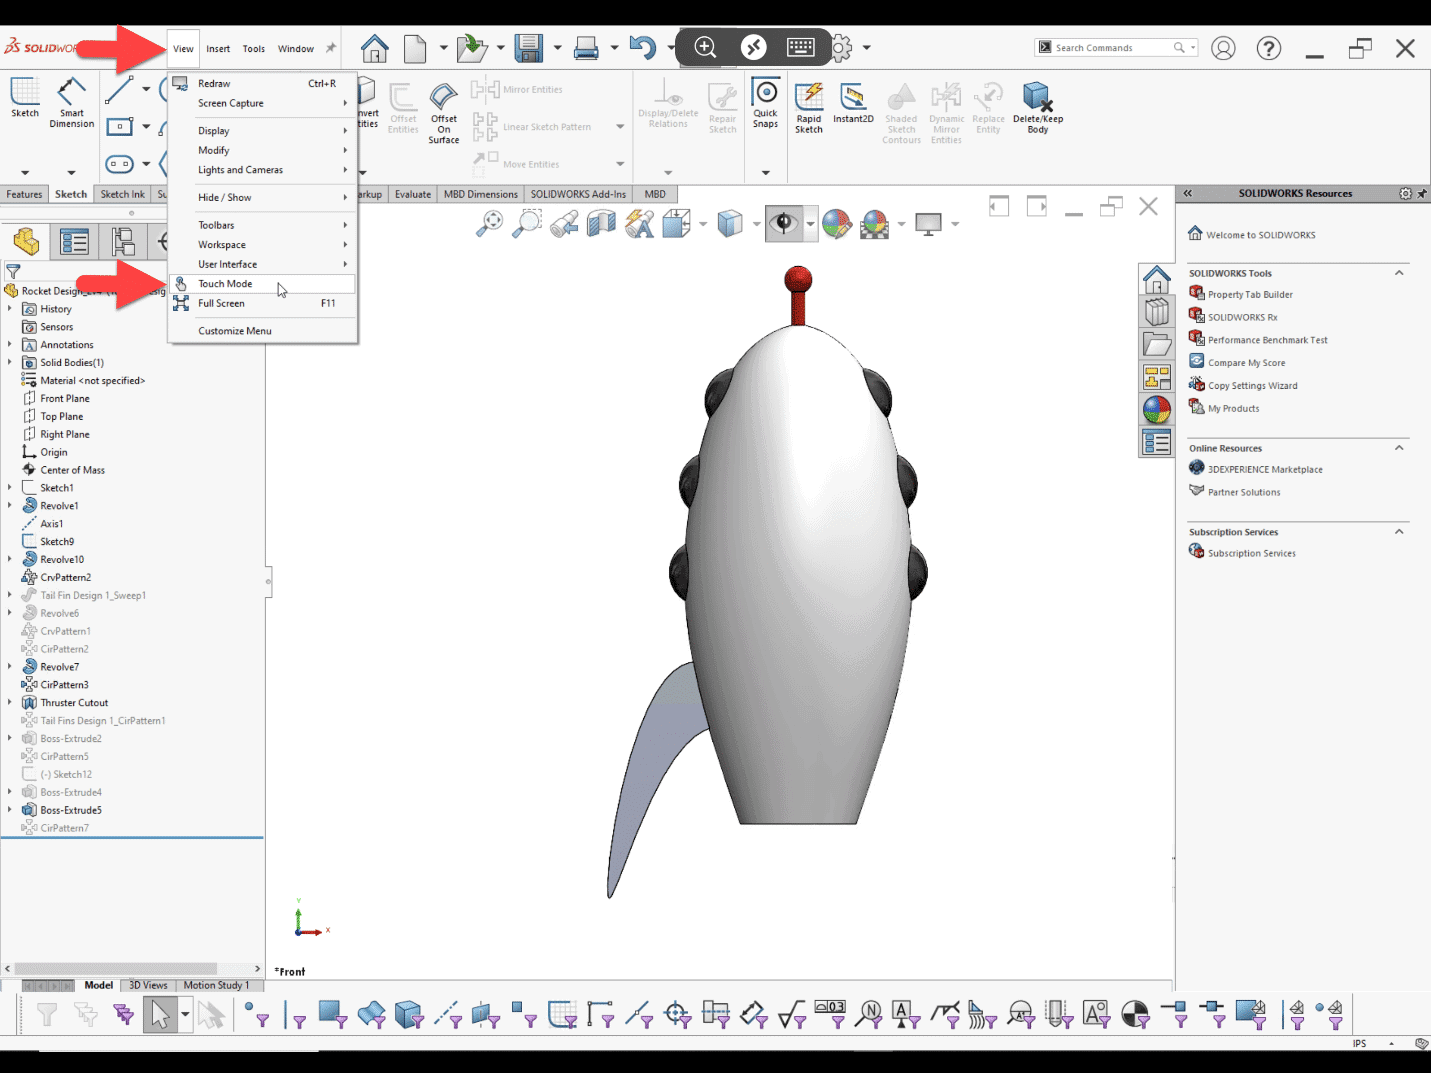
Once you have remoted into your session and started SOLIDWORKS you will want to activate Touch Mode. Go to the View drop down menu and select Touch Mode.
You will see the Touch Mode toolbar appear on the left-hand side of your screen. This toolbar can be on the left or right-hand side of the screen and is determined by your Windows settings.
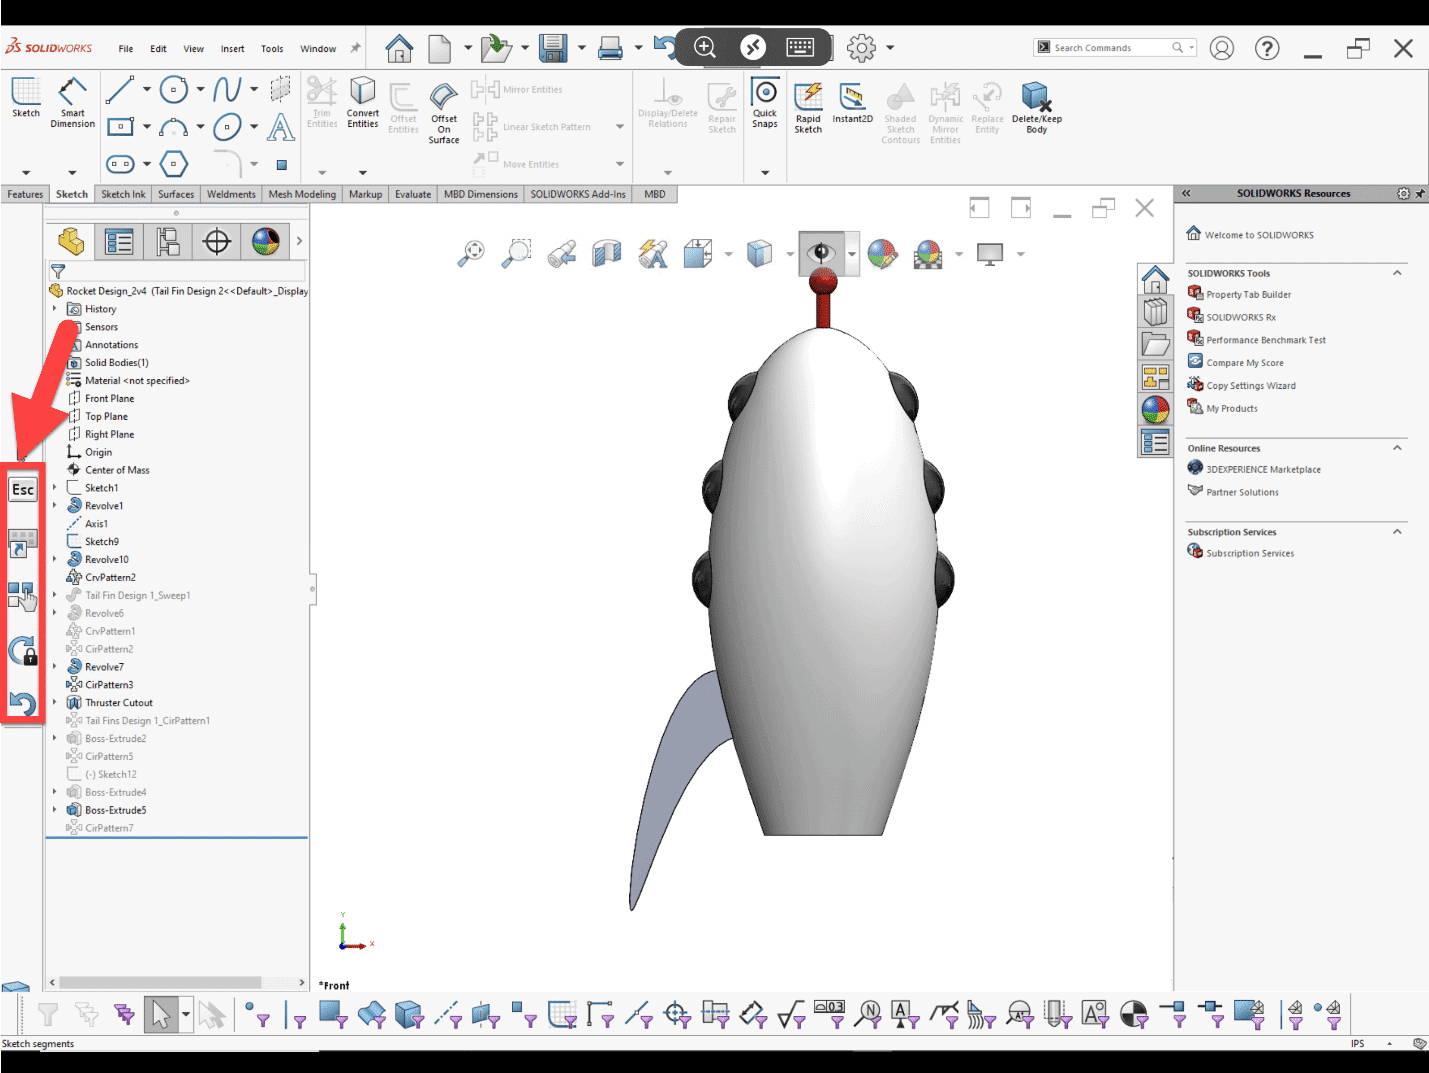
The icons shown in this bar are the following: Escape, Shortcut Key, Multi-Select, Lock 3D Rotate, and Undo. The majority of keyboard shortcuts will function in this mode. The shortcuts for Views using ctrl + (numbers 1-8) function normally. Let us discuss each one of the commands from the Touch Mode toolbar and how to implement it into your workflow. One of the biggest things you will notice is that instead of using your left hand for keyboard shortcuts you will be using your left hand for commands on the touchscreen.
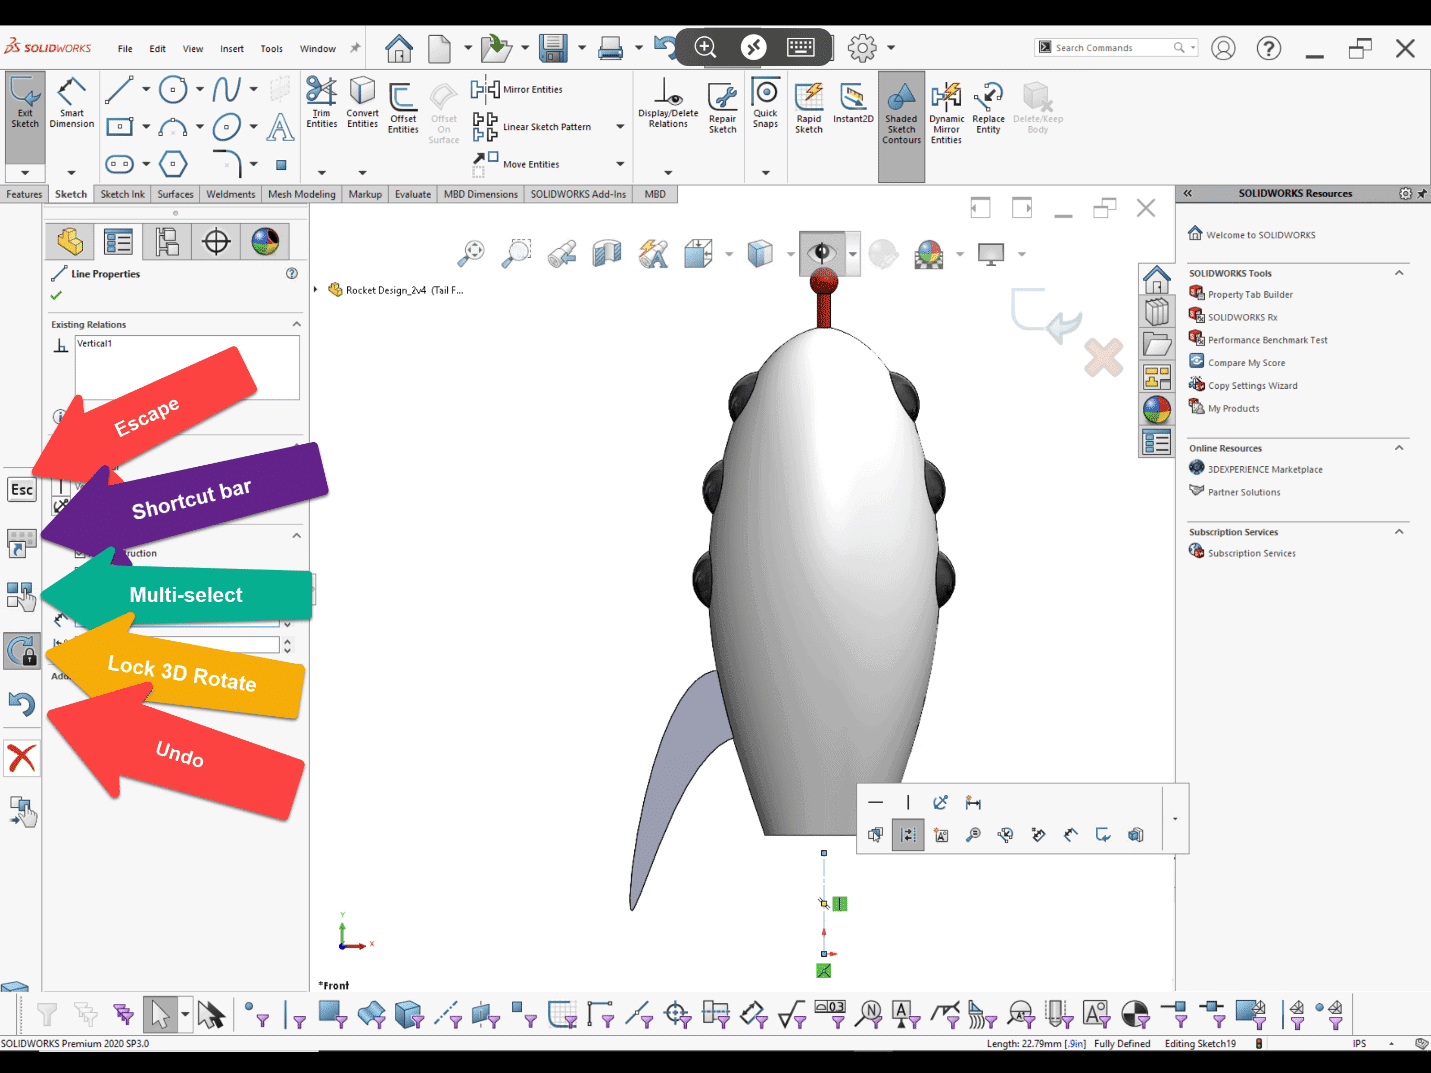
Escape – I am using the Apple Magic Keyboard for my iPad Pro which would seem like an important factor because it does not have a physical escape key. It does however have a keyboard shortcut that acts as the escape key, elegant it is not. If you click the command key + the period key (command + .) together it acts the same as hitting the escape key. If you are using a Bluetooth keyboard you may use the escape key as normal. I tested this using my Logitech K810 Bluetooth keyboard. You could also map the escape key as one of your mouse gestures. Of course, you can also use the escape command on the Touch Mode toolbar since the expectation is that your left hand (or right hand, depending on Touch Mode toolbar placement) will be using the toolbar instead of keyboard.
Shortcut key – The shortcut toolbar key (default is set to the letter S) has been turned off. The shortcut toolbar command on the Touch Mode toolbar replaces it. Another method for activating the shortcut toolbar command is to set it as one of your mouse gestures. I noticed that sometimes I would get a strange white box on my screen. This seems to be linked to the S key somehow. If this happens to you, you need to click on the shortcut command on the Touch Mode toolbar or activate if you have it mapped as a mouse gesture. Once the shortcut toolbar appears and you exit out of the command the blank white box will disappear.
Multi-Select – The multi-select command works the same way as the control key on the keyboard. The control key still functions as normal as well. You will use the multi-select command when you want to select more than one entity on the screen using your finger or the pencil. This will take a little getting used to.
Lock 3D Rotate – By default, when you touch the graphics window and drag your finger or the pencil the model will rotate around the graphics window. When the Lock 3D Rotate command is active that functionality is turned off. When it is turned off you have the ability to box select entities in the graphics window. You can however still pinch to zoom in or out using your fingers.
Undo – Hitting control + z functions as expected or select the command from the Touch Mode toolbar. You can also map undo as a mouse gesture. You may also select the undo command from the top of the screen.
I hope that we are starting to see a little bit of a trend here. The Touch Command toolbar and mouse gestures replace the majority of your keyboard shortcuts. “What does this mean for me?” you may be asking yourself? What it means is that we need to get you used to using your left to select commands instead of using the keyboard shortcuts. There is a little bit of a learning curve. If you haven’t implemented mouse gestures into your current workflow then this would be an excellent time. Without a doubt Mouse Gestures are one of my favorite efficiency hacks.
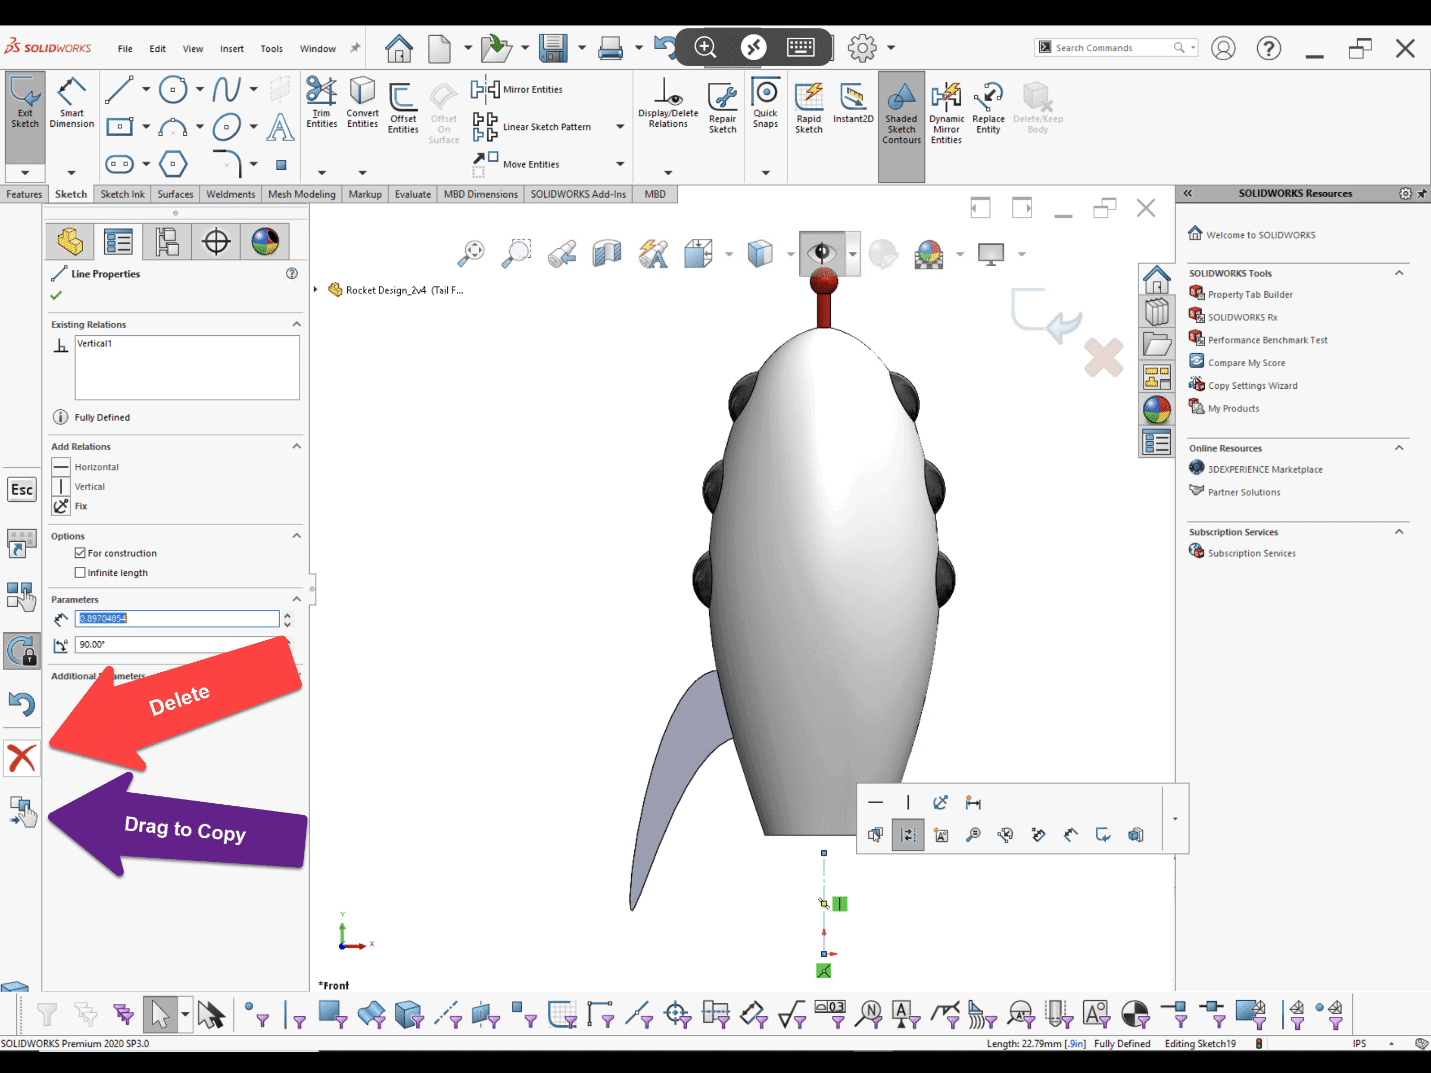
I would also like to point out that there are some context sensitive commands that come up under the Touch Mode toolbar. These will be Drag to Copy command and the Delete command.
Another thing worth mentioning is that we are still using the ctrl key for shortcuts on the keyboard. I only point this out because you usually use the command key inside of iOS and OSX. Not so when you are remoted into your Windows machine. This actually caused me a bit of issue at first since I naturally wanted to use the command key when on an Apple device. Just something to be aware of in case you think that your keyboard shortcuts aren’t working. Make sure that you are hitting the ctrl key.
Here are some other tips for getting your workflow moving smoothly.
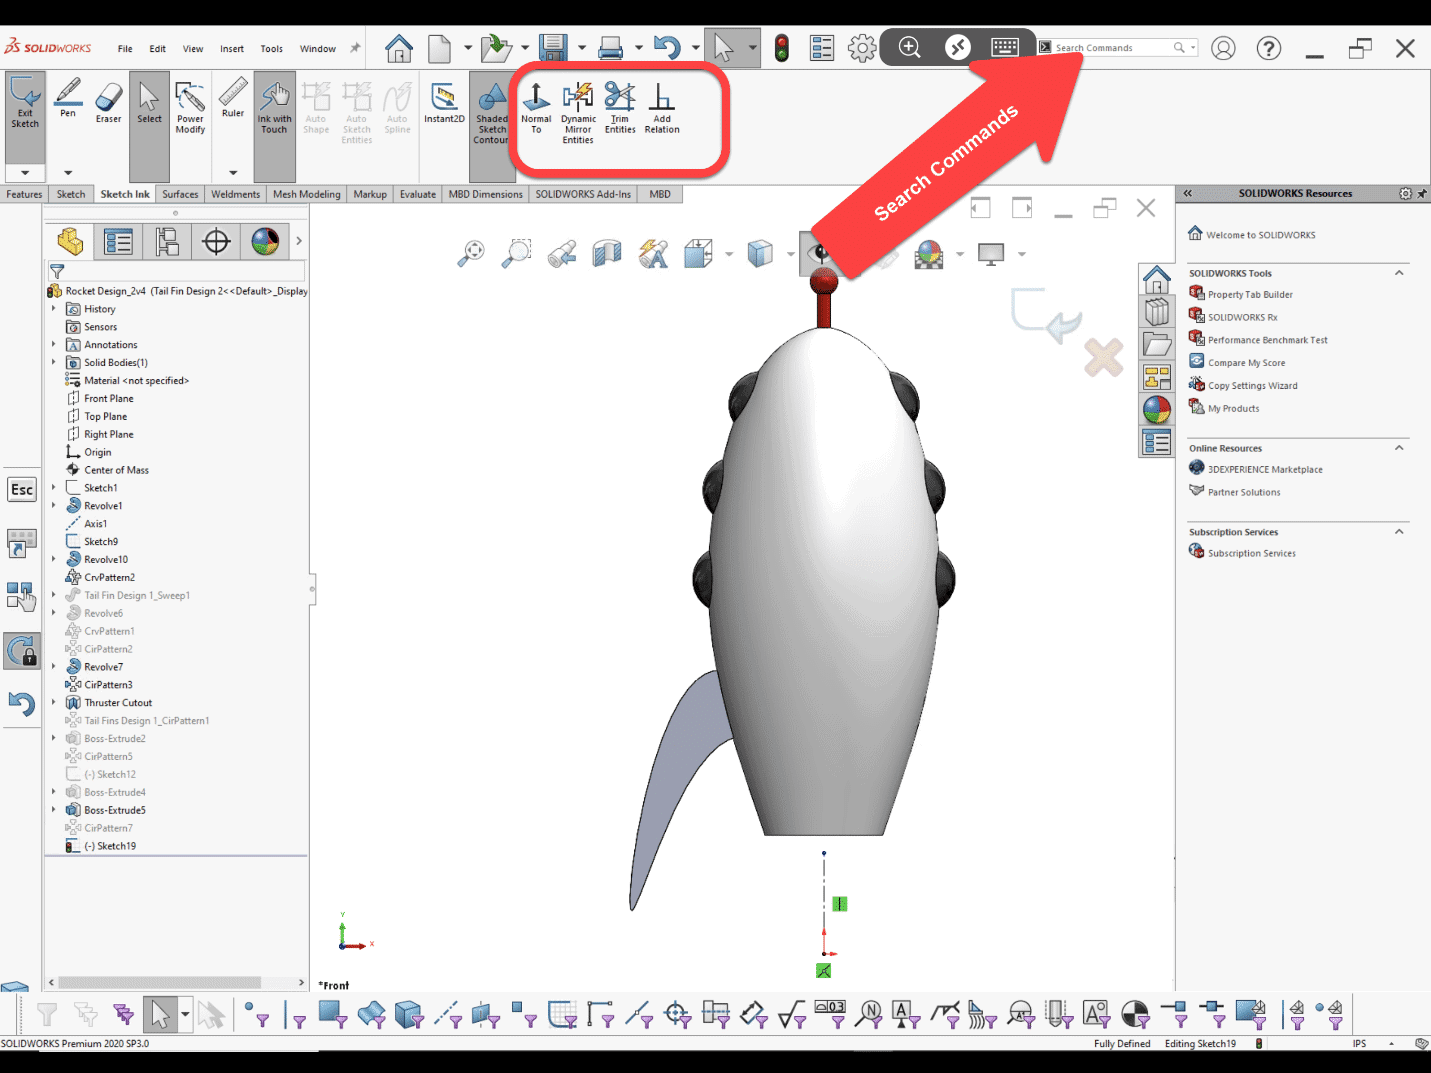
Add your commonly used commands to the Sketch Ink toolbar in the Command Manager. You can see some of the ones that I have mapped in the image below. This will make you much faster since you do not need to navigate back and forth from other command tabs. You can do this by using Search Commands and then dragging and dropping the command directly onto the Command Manager.
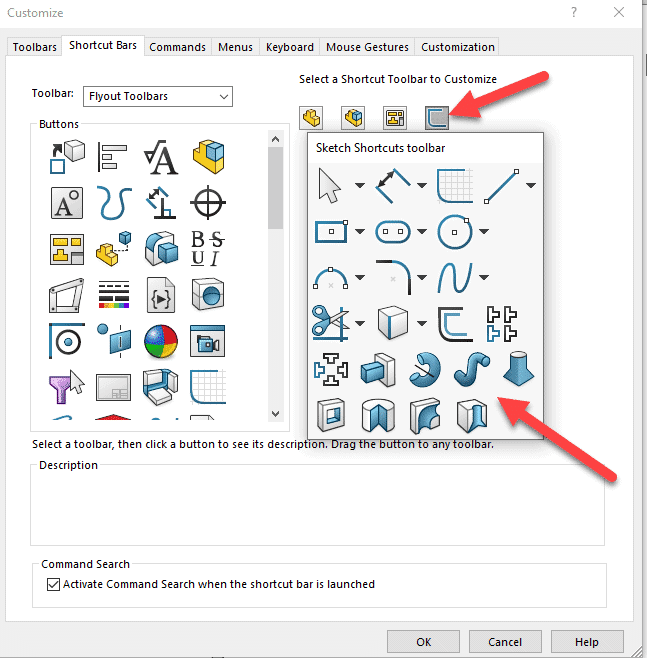
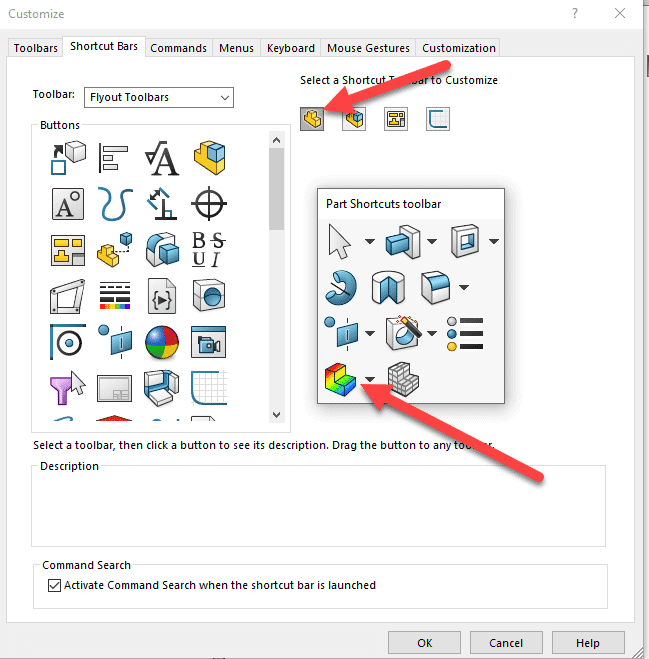
Another method for accomplishing this is to add these commands to your shortcut toolbar. Here is a tip that reminds me of the movie “Inception”. You can add any of the command types (part, assembly, sketch, or drawing) to the 4 different shortcut toolbars. This means that I can add commands that are for part, assembly, sketch, or drawings and “Incept” them into any of the shortcut toolbars. Why I say it is like “Inception” is that I can add Feature (Part) commands such as Extruded Boss or Extruded Cut into my Sketch shortcut toolbar. This means I no longer need to exit a sketch in order to access the Features Shortcut toolbar. You will find that this will speed up your workflows.
Also, if you work in Simulation, I highly recommend adding Simulation Commands into Shortcut Toolbars. This makes setting up Simulation Studies, especially assemblies, much faster. You can see that I have added
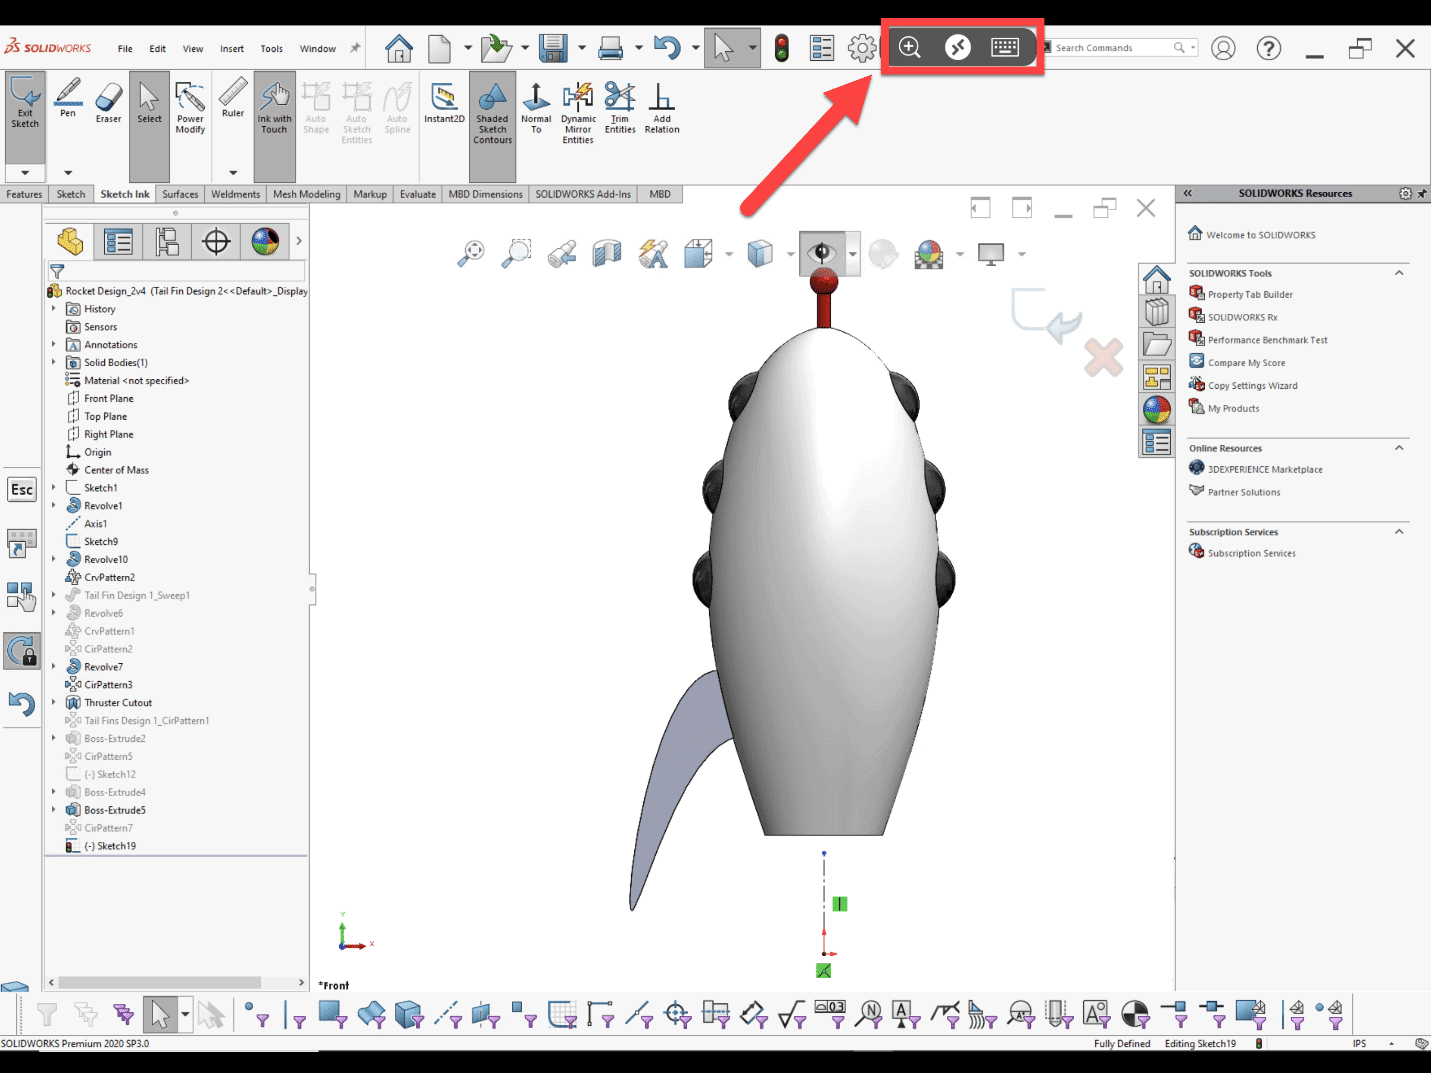
The last thing that I want to mention is that the Remote Desktop App menu bar at the top of your screen may be in the way of some of your commands or properties. This menu bar can be moved out of the way.
Default Remote Desktop Menu Bar Location
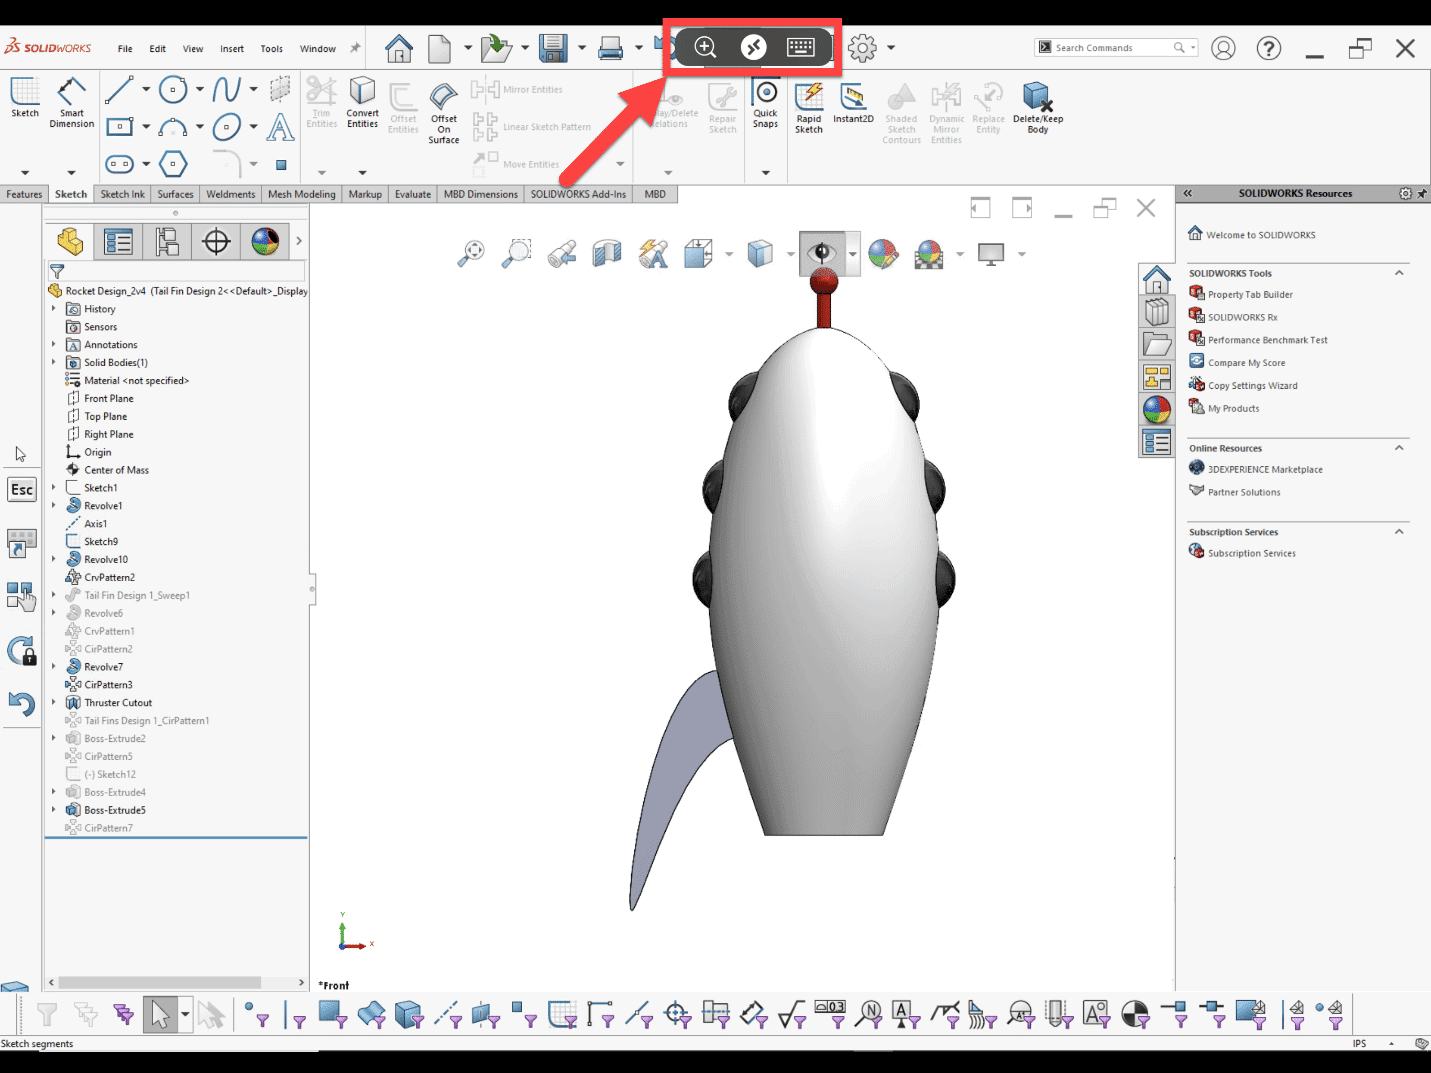
Relocated Remote Desktop Menu Bar Location
That brings us to the end of our blog article today. I hope this information provided some helpful tips and provided further detail about using SOLIDWORKS Touch Mode on your iPad! Till next time everyone!
Again, please check out Parts 1 and 2 in this series:
Part 1: https://www.cati.com/blog/2020/08/using-a-tablet-or-ipad-for-solidworks/
Part 2: https://www.cati.com/blog/2020/11/using-a-tablet-or-ipad-for-solidworks-part-2/
James Reeher
Application Engineer
Computer Aided Technology, Inc.

 Blog
Blog