How to Scale in SOLIDWORKS
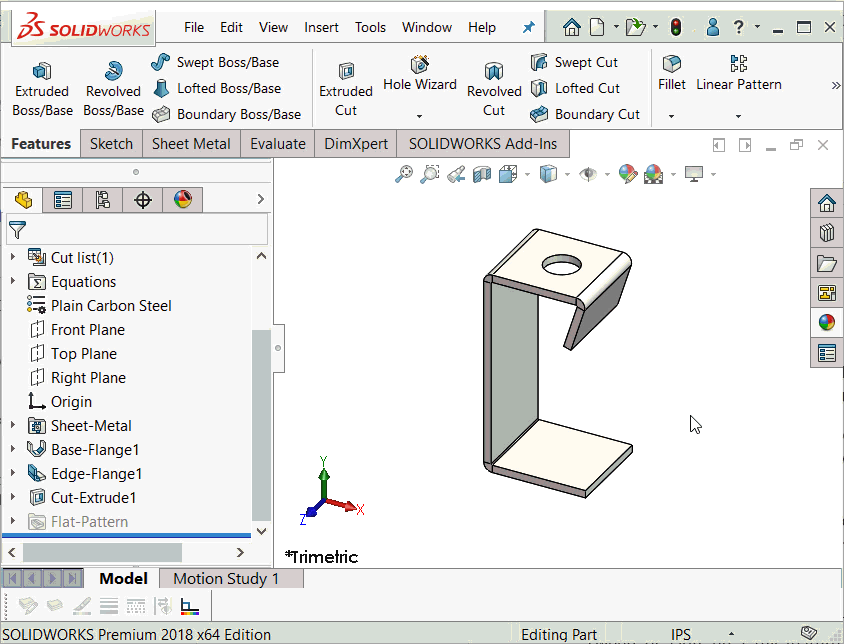
 Say you just modeled a sheet metal bracket and it has a couple of cuts and some flanges on its end. Now you have to make another one that is exactly twice as large as well as another that is half the current size. How would one accomplish this? Well, just like all things in SOLIDWORKS there are multiple ways to do so. One way is using the Scale tool which I’ll discuss the benefits and disadvantages of – at a practical level – in this blog post. Let’s take a look at how to scale in SOLIDWORKS.
The Scale feature in SOLIDWORKS is a history-based feature that scales solid and/or surface bodies in your part. Not that every bit of my definition there serves a distinct purpose. Let’s break it down.
History-based feature
As a SOLIDWORKS user, you understand that when you add a boss extrude (or a cut extrude, sweep, loft, etc.), this feature is added as the next feature in your model’s FeatureTree. This has several ramifications – most of which you are likely familiar with. I’ve called this to mention with the Scale feature because it’s important to realize what the feature does and does not do.
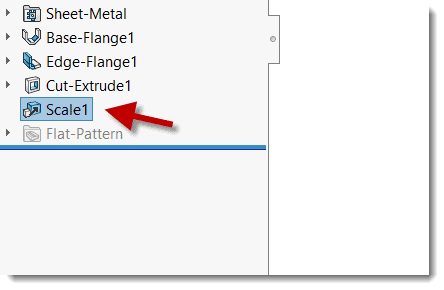
Let’s revisit the example of the bracket with holes and flanges. Say you have a handful of features in your FeatureTree. Then, you add the Scale feature by going to Insert > Feature > Scale. You opt to scale the model by 0.5, creating the version of the model half of the original size.
What does this mean? What happened to the preceding features? Has the definition of the base flange, cut extrudes, and/or edge flange features changed? The answer is no!
Scale solid and/or surface bodies in your part
It’s important to realize that the Scale feature in SOLIDWORKS does not influence anything about the definition of previous features. It’s only concerned about scaling topology – bodies, to be exact. It doesn’t change pre-established features/sketch dimensions. It just makes it so that, at this point in the FeatureTree, the body as it exists therein is scaled by whatever factor the user inputs.
Try this: Sketch a rectangle and add some dimensions and extrude the shape by some depth. Take note of what your dimensions are. Then, use the Scale feature. Scale the body by a factor of 2.0 (double its original size).
Evaluate > Measure should show that the body is now double its original size. Try editing the rectangle sketch, though. You’ll find that the sketch dimensions remained the same value they were pre-scaling. This is because when you chose to edit the rectangular sketch, you inherently chose to roll back in the FeatureTree to access this feature’s definition.
This rolls you back to a point before Scale was established. Exit the sketch. Now, as another experiment, double-click the rectangle sketch – this should show its dimensions. Note that the dimensions are still the same, even if the body itself has doubled in size by virtue of the scaling operation.
Lastly, the Scale feature in SOLIDWORKS is a feature available to parts only. If you need to scale an assembly, your best bet might be to save the assembly as a part (File > Save As), then scale this file.
When you save an assembly as a part, you’re simply saving solid bodies. All feature and sketch dimensions used to create the original parts are not included in the conversion.
This doesn’t matter to the Scale feature since again, it neither needs nor considers these dimensions. This is a nicety for imported bodies (IGES, STEP, etc); technically, you can import a body then immediately use the Scale feature to resize it in one step.
“What if I need to scale the dimensions?”
If you need to scale the sketch and feature dimensions you’re going to need to do this manually. There isn’t a one-step feature or out-of-the-box tool to scale all dimensions in a part file.
What’s cool about SOLIDWORKS is that you can write or find macros to automate seemingly tedious operations like manually scaling all dimensions in a part. Check out the forum here.
This forum thread also lists another method for scaling all dimensions relatively easily, making a design table and implementing the dimensional scale factor as a part of an Excel formula.
If you find yourself having questions about scaling, please feel free to contact our SOLIDWORKS support department. We’re always happy to answer technical questions from our customers related to our blog posts!

Related Articles
How to Mirror a Part in SOLIDWORKS
How to Change Material in SOLIDWORKS: Customized and Standard
How to Make Threads in SOLIDWORKS: Basic and Custom
About the Author
 Sean O’Neill is a Senior Support Engineer at Fisher Unitech. He is a Certified SOLIDWORKS Expert (CSWE), a SOLIDWORKS World Presenter, and a former SOLIDWORKS VAR Marketing Manager. You can follow him on Twitter: @ServicePackSean.