How CPU Core Count Improves SOLIDWORKS Flow Simulation Meshing and Solution Times
Hello everyone!
A common question that we get asked is “Does SOLIDWORKS Flow Simulation use multi-core processing for its analyses?”. The answer is “Yes”, but I want to take a moment to dig into this topic further and provide more detail. Today I will be sharing information from a helpful document found in the SOLIDWORKS Knowledge Base, which all of you can access through your SOLIDWORKS Customer Portal Account. The Solution ID for the article is S-034487 and the title is “Usage of multiple cores and influence on meshing and solution time”. If you search using the solution ID provided you will find it.
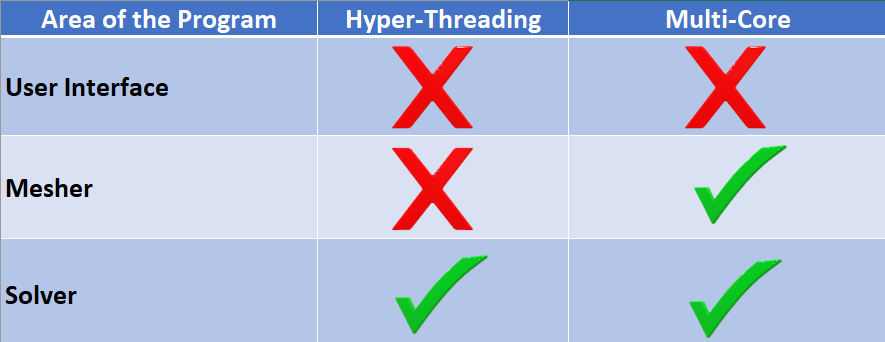
Quick Note: SOLIDWORKS Flow Simulation added multi-core support in 2009. This support was initially only for the solver portion of the analysis. In 2014, multi-core support was added for the meshing portion of the analysis. Hyper-Threading is only supported for the solver portion of the analysis. Now I know some of you are saying “What is the difference between Hyper-Threading and Multi-Core or Multiple Cores?”. I am glad that you asked! Multi-Core (or Multiple Cores) represent actual physical cores on the CPU (each core has separate physical space on the CPU). Hyper-Threading is a method of tricking the operating system into thinking that each physical core is actually two cores. These are considered “logical cores” and they share the same resources on the physical core. By the way, Hyper-Threading is just a marketing name from Intel. AMD (Advanced Micro Devices) also has similar technology. AMD’s is called Simultaneous Multi-threading (SMT).
Below is a visual breakdown of the areas that can take advantage of Hyper-Threading and Multi-core Processing.
Now let us learn more about how the software can take advantage of these technologies.
Influence of core count on meshing time
Below is a visual that shows which parts of the meshing process utilize Multi-core (Parallel Computing) and which do not (Single-Core, Single-Threaded).

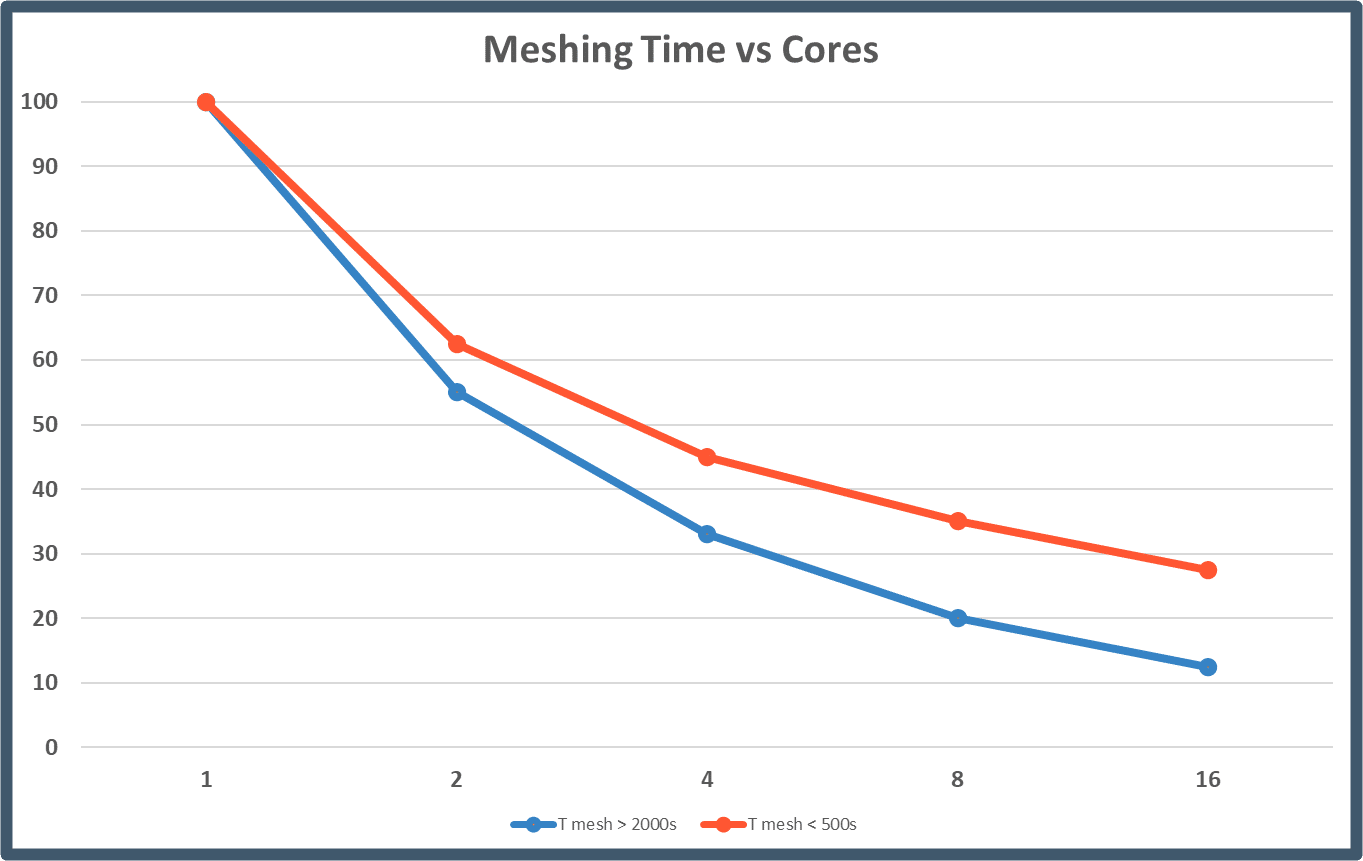
Now let us look at a chart that shows how the number of cores affects the total meshing time (see image below). A single core will provide a mesh time represented as 100% and then all the other data points will be a percentage of that time. Also, note that the chart has two different lines for the two data sets. The data set shown in blue had an initial meshing time of over 2000 seconds. The data set shown in Orange had an initial meshing time of under 500 seconds. The Y-axis unit is a percentage of time, and the X-axis represents the number of cores. The values shown are approximate.
Influence of core count on solution time
Let us now look at how multi-core processing applies to solution time. While we do see improvement by adding cores, we do eventually see diminishing returns. The end results show that once we go past 8 cores, there is very little improvement to the solve time. One should understand that as we increase core count, we also increase the computational load required to manage the parallel computations, thus the diminishing returns. One should also note that SOLIDWORKS Flow Simulation is an iterative solver (not explicit). This does mean that each iteration needs to be solved before the next iteration can be solved. The chart below shows the type of expected solution time percentages with respect to core count.
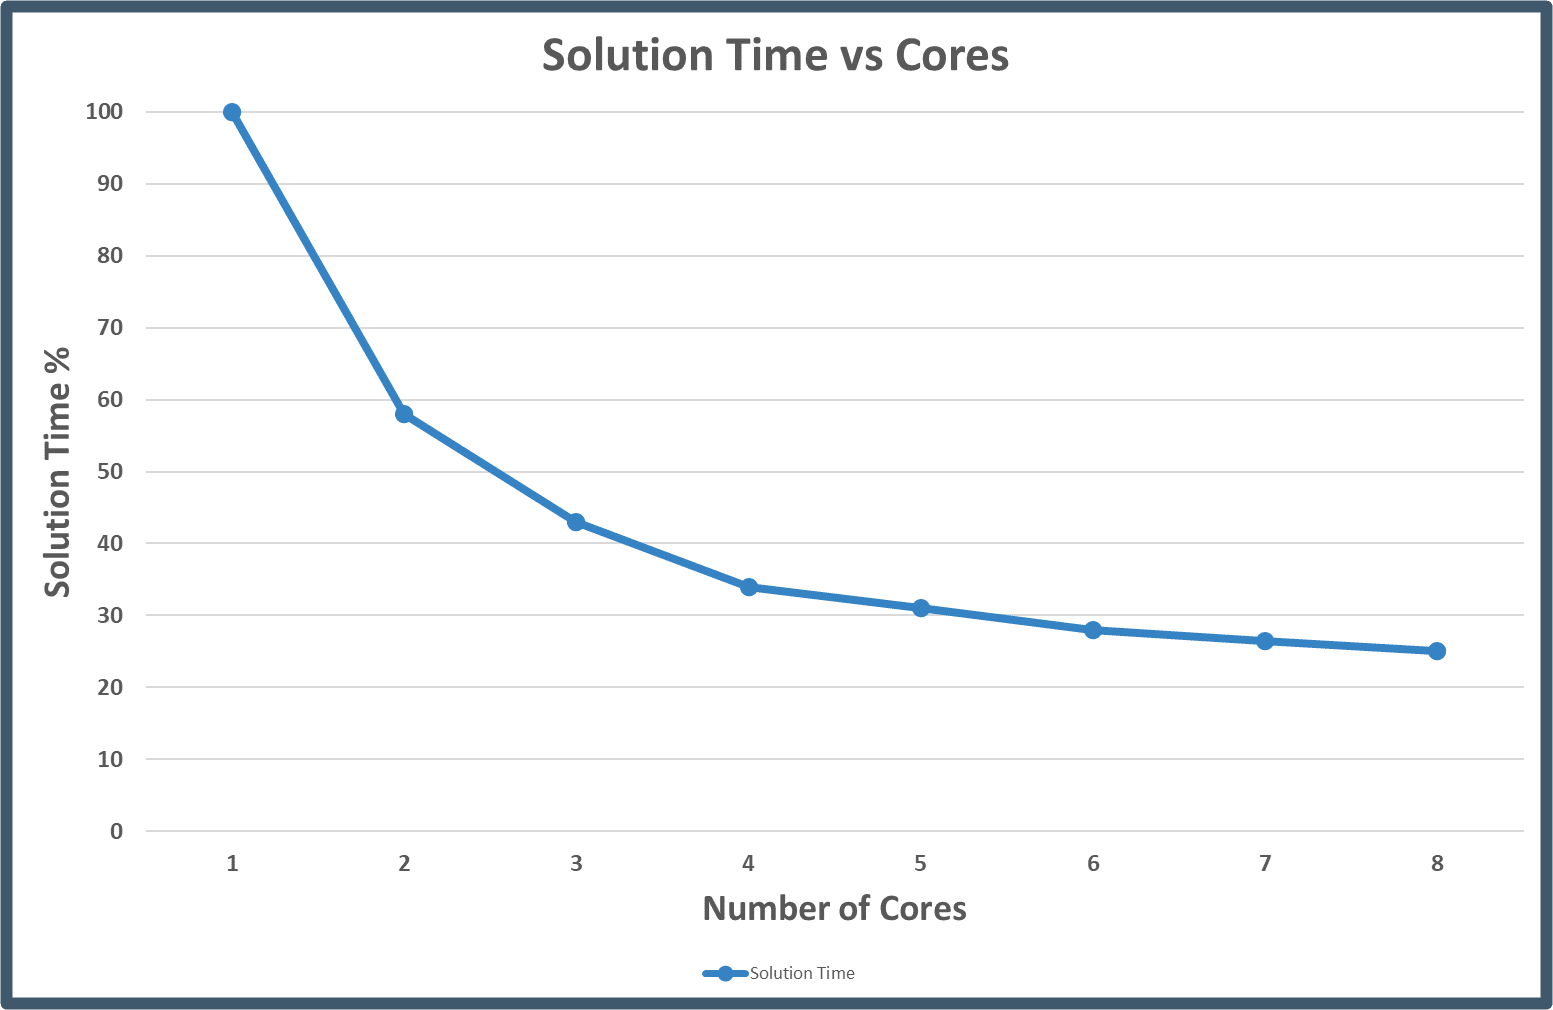
Now, this does not mean that having a 12 core or more CPU could not provide a benefit. You could have a 12 core CPU then allocate 8 cores for SOLIDWORKS Flow Simulation and the other 4 cores for your other applications using processor affinity.
Tip: Communication between cores on the same CPU is faster than communication between cores on two different CPUs, e.g., a single CPU with 8 cores will be faster than two quad-core CPUs.
Notes:
- The data above was obtained using SW 2017 using various models. The tests included gas + liquid + heat transfer in solids, non-Newtonian flow, and rotating regions.
- The curve for the plot above will not be identical for all models, machines, and analyses. Certain types of studies (free surface, sliding mesh) may see different returns. This is a typical trend but there will be scatter on the exact performance results. You should not expect to see the exact same curve for your own tests.
- You do have the ability to select the number of cores that you want to use for your simulation. Open the Run dialog box and then select the number of cores from the Use CPU(s) list. Please be aware that the number of available cores is based on your operating system and may be different from the number of processors or physical cores on the computer.
Hyperthreading
The information that I am presenting in this article was last reviewed in 2017 and we have seen many changes and enhancements to hardware and software in that timeframe. With that being said, I have also seen differing test results when it comes to hyperthreading being turned on or off. Based on the mixed results I do not feel confident in giving a specific recommendation one way or the other. It appears to be better for some hardware sets than others. It is most likely a combination of hardware and software that makes one option better than the other. This is an area that we will revisit and update once we have more current data.
Solving Multiple Projects Simultaneously
SOLIDWORKS Flow Simulation allows for up to 2 projects to be solved simultaneously. This can save time if set up properly, but it can cause slowdown if not. The total number of used processor cores should not exceed the number of physical cores on the CPU. Remember, hyperthreading makes it appear as though you have double the number of actual physical cores. So, if you want to maximize the performance for this method you will assign several of your CPUs to SOLIDWORKS and then the rest towards your other applications. If you want to guarantee that you are assigning your physical processors correctly you will want to turn off hyperthreading. This will be accomplished through your BIOS.
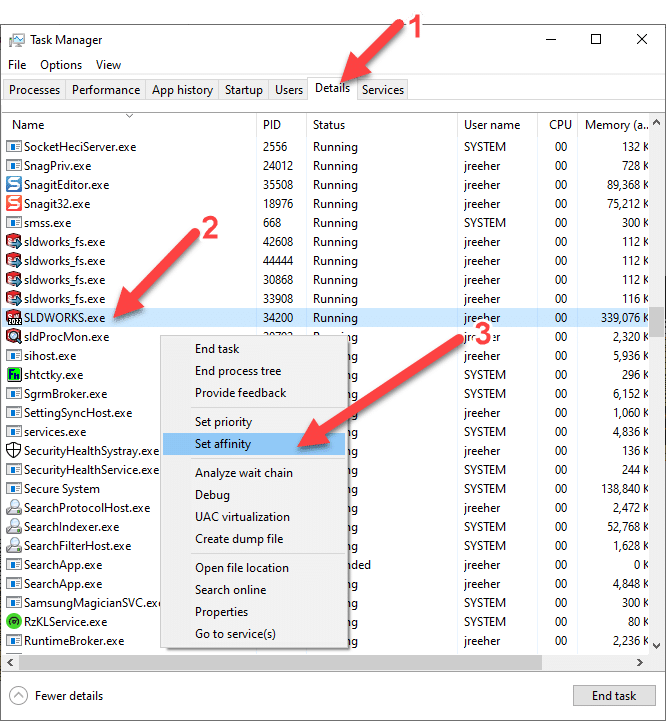
The method for assigning the CPUs (processors) is called Processor affinity. Open your Task Manager and go to the Details tab. Then scroll down under the Name column until you find SLDWORKS.exe. Highlight “SLDWORKS.exe” and RMB (Right Mouse Button click). Then select the option “Set affinity” from the popup menu. See the image below.
A new popup menu will appear named “Processor affinity”. You will now be able to choose which processors are assigned to the application. Boxes with the checkmark are the assigned CPUs. In this example, I set CPU 0 – CPU 5 for SOLIDWORKS. Then click “OK”. See the image below.
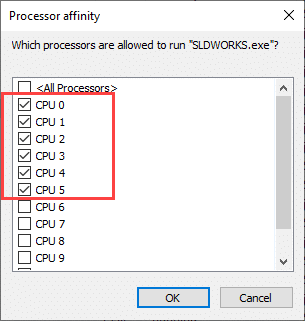
Now to assign the other CPUs for your other applications you will do the same process, except you will deselect SLDWORKS.exe from the list. Make sure to use the other CPUs, in this case, it would be CPU 6 – CPU 11.
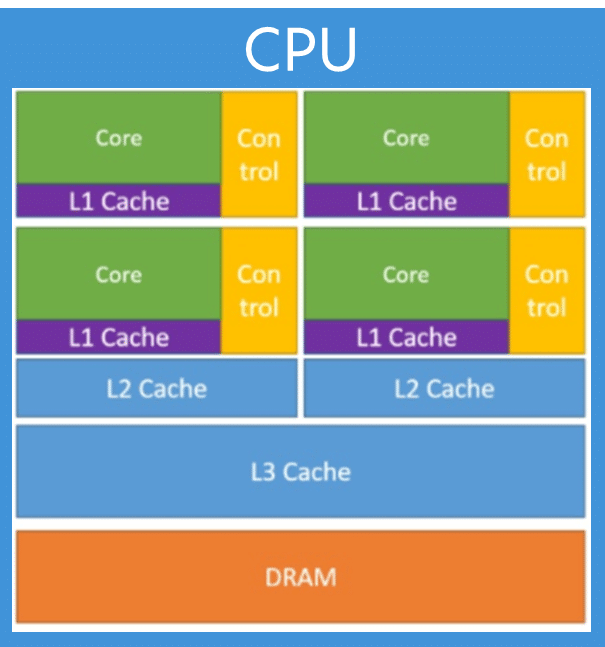
One last item of note. Each physical CPU has internal cache that is shared with all of the CPU cores. This is the L3 cache. This cache is most effectively used when the process is run on the same physical CPU. If your computer has more than one physical CPU (not core) and the process is shared across these physical CPUs it will not run as efficiently. Image shown below for the basic architecture of a CPU.
I hope you have a better understanding of utilizing multi-core CPU processors with SOLIDWORKS Flow Simulation. As hardware and software technologies are always in flux, we will do our best to keep this blog updated with any changes that occur in the future.
Till next time everyone!
James Reeher
Application Engineer
Computer Aided Technology

 Blog
Blog