Installing SOLIDWORKS 2017: Best Practices
When the time comes to install or update your SOLIDWORKS software to a newer version, the process can feel a bit overwhelming. Below is a guide to help you through this process. Following these steps should ensure a clean and successful installation.
I have broken down the sections into “RECOMMENDED” and “OPTIONAL”. Each step in “RECOMMENDED” should be followed and thought of as required. The sections marked “OPTIONAL” can be skipped, but might give you some good tricks for ensuring that everything goes smoothly on the user end.
A note about SOLIDWORKS Electrical and SOLIDWORKS PDM
The following guide is intended as a guide to update the SOLIDWORKS software and its add-ins, but there is a notable exclusion of information regarding SOLIDWORKS Electrical and SOLIDWORKS PDM. These programs both run on an SQL backbone, and if your intention is to include these products in the upgrade process, please contact our tech support team for guidance on these specific products.
Before the Installation
- Get the FULL DOWNLOAD of SOLIDWORKS
This is demonstrated in the following video. As the video shows, this download contains everything you need for a NEW installation, a SERVICE PACK installation, a REPAIR or a MODIFY. This FULL DOWNLOAD is a very handy tool.
- Place a copy of the FULL DOWNLOAD on each end user machine
The full download is approximately 10GB in file size. We recommend placing a copy of this full download into a local folder on the end user machine (not on a network drive). If you don’t know which folder to use, you can make a new folder called C:�0 SOLIDWORKS INSTALLS on each user machine, and copy the full download into this folder.
The default location is: “C:Users[username]DocumentsSolidWorks Downloads” - IMPORTANT – Update the graphics card drivers
On each user machine, the graphics card/driver combination should be reviewed to ensure that the computer is running a supported graphics card and that the card is using a supported driver.
A list of all supported graphics cards/drivers may be found on the SOLIDWORKS website.
The same should be said for all hardware, but an unsupported graphics card or an older driver is one of the most common causes of instabilities when running the SOLIDWORKS software. So it gets a special mention in this install guide. - Update the SOLIDWORKS Network License Manager (if applicable)
If your team uses distributed licensing via the SOLIDWORKS SNL, install the latest SNL manager as shown in this video.
If your team does use a SolidNetwork License, it must be updated before the clients will be able to launch SOLIDWORKS.
OPTIONAL:
- Let the team know when the update is taking place –
End users will often have settings/files they want to backup before doing an update to the software – So let them know the anticipated schedule.
- Backup Files and Libraries –
When updating to a new version of the SOLIDWORKS software your libraries and referenced files may be upconverted to a new file format which is incompatible with earlier versions of SOLIDWORKS. If you have a company directory that represents your SOLIDWORKS libraries and referenced files, this would be a good time to back it up.
- Backup of PDM Vault and SWE Data –
As mentioned earlier, if you are doing a PDM upgrade or a SOLIDWORKS Electrical upgrade, please contact us so that we can work with you on the best steps for the upgrade process. But again, this is a good time to make a full backup of your PDM Vault and your SWE databases.
On the day of installation
RECOMMENDED:
- Reboot the end user machine
- Make sure the end user machine login has full admin rights
- Disable any antivirus that could affect/block in the installation
- From the FULL DOWNLOAD folder, launch setup.exe

This will launch the SOLIDWORKS Installation Manager
In the installation manager:
Choose to do an INDIVIDUAL INSTALLATION:

On the next screen input your serial number or numbers:
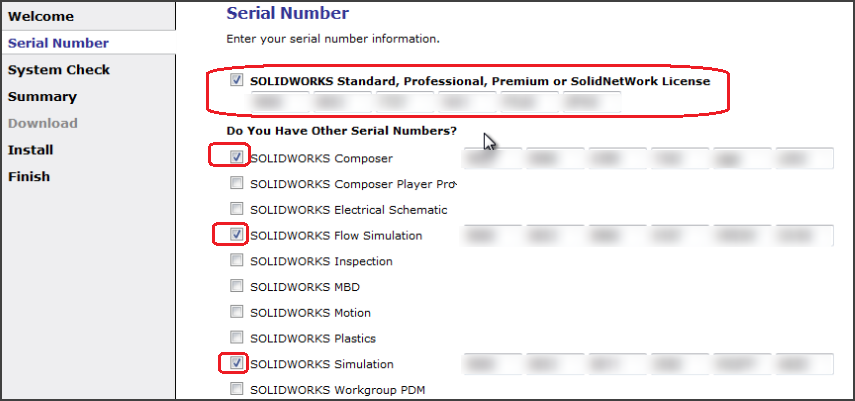
On the next screen SOLIDWORKS will connect to the main serial number database to check your serial number and to determine whether any additional updates are available:

What happens next will depend on your existing SOLIDWORKS installations on this computer:
- – You may get a warning about a previous version of SOLIDWORKS Electrical exists on this machine. If so, choose NEXT
- – You might get a message about the existence of a newer version of the software, or a newer service pack, available for download.
If so, choose to continue installing THIS version of the software (from the FULL DOWNLOAD)
- – IMPORTANT – You may get an “INSTALLATION OPTION” indicating that one or more older versions of the software were found on your computer. If this screen appears, we recommend using the option to CREATE A NEW INSTALLATION OF SOLIDWORKS. This will leave the old version on your machine, which can be very useful and which rarely causes conflicts.

NOTE – Once files are saved in SOLIDWORKS 2017, they cannot be opened in SOLIDWORKS 2016 (technically they can be opened, but can only be used in a limited capacity – See “Future Version Components in Earlier releases” on help.SOLIDWORKS.com)
On the next screen, you will be looking at a “Summary” of the installation options. On this screen you will see links to CHANGE the installation along the right side:
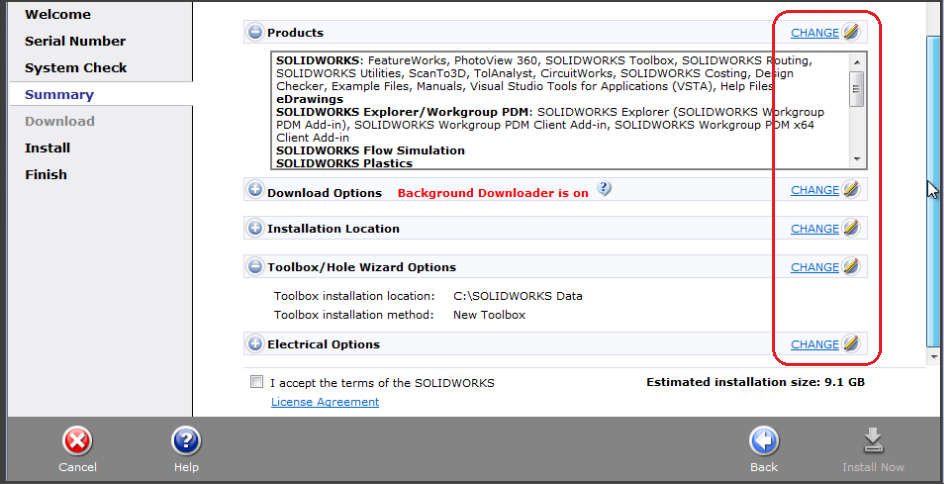
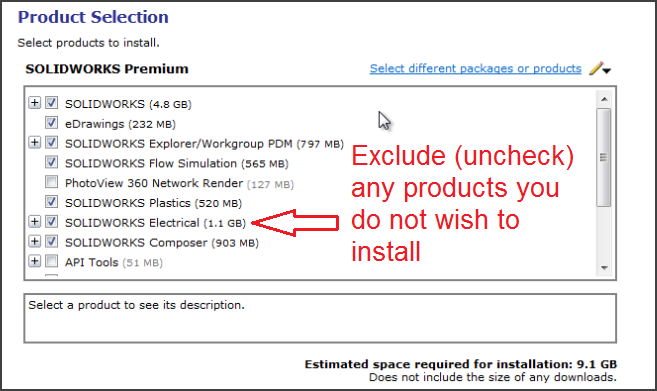
Choose the CHANGE option next to “Products”. Make sure you have everything selected that you want. Make sure ELECTRICAL is not selected (unless you are intentionally including it).
OPTIONAL – Click the CHANGE option next to DOWNLOAD OPTIONS – Turn off (uncheck) the option for “Background Downloader”.
Now that you know now to do the FULL DOWNLOAD, you do not need to use the Background Downloader.
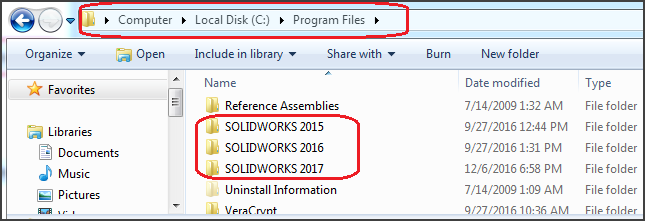
IMPORTANT – Click the CHANGE option next to INSTALLATION LOCATION – change the default location from “C:Program FilesSOLIDWORKS CORP” to “C:Program FilesSOLIDWORKS 2017”.
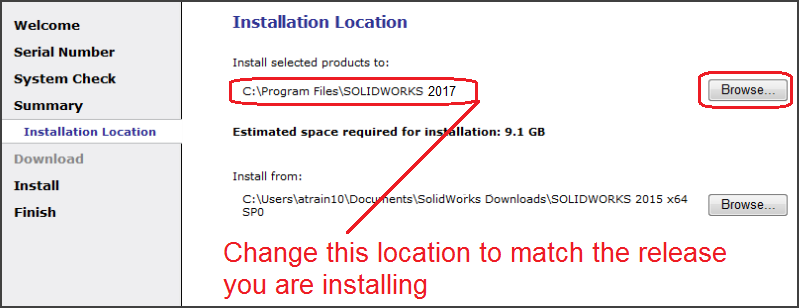
Having an explicit directory for each version of the software will make it very easy to keep your libraries and directories distinguishable, when working on a computer with multiple versions of the software:
IMPORTANT – Click the CHANGE option next to TOOLBOX/HOLE WIZARD OPTIONS – Use the FIRST option on this page – Create a new 2017 TOOLBOX.
Change the default location from “C: SOLIDWORKS DATA” to
“C: SOLIDWORKS 2017 DATA” (or “C: SOLIDWORKS DATA 2017”).
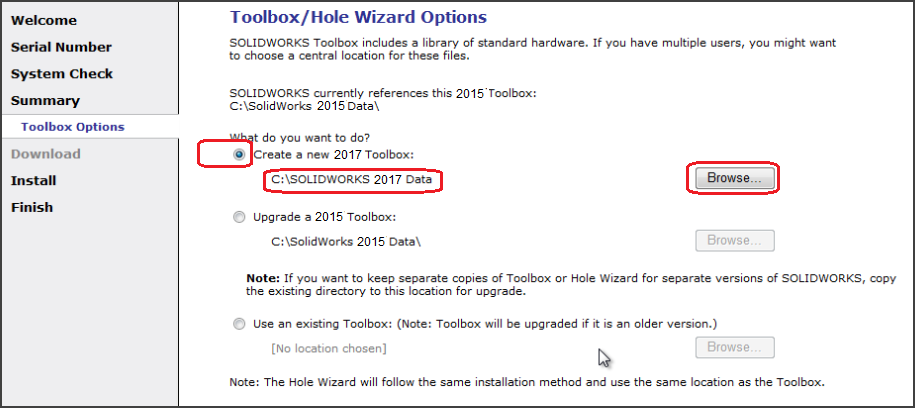
Again, having an explicit directory for each version of the TOOLBOX database will make it very easy to keep your libraries and directories distinguishable, when working on a computer with multiple versions of the software.
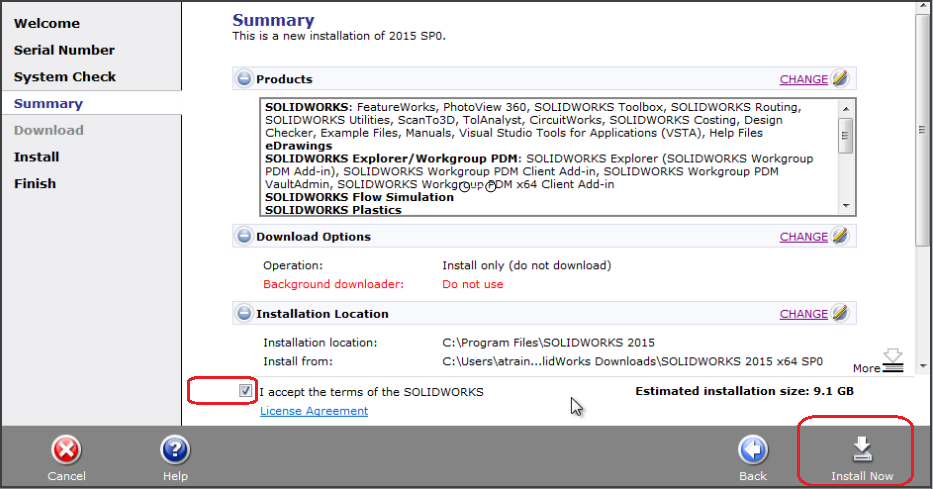
That’s it for OPTIONS! You should now be able to click the checkmark for
I ACCEPT THE TERMS, and then click the INSTALL NOW button:
The install of SOLIDWORKS 2017 takes about 30-45 minutes.
While the software is installing, refrain from running any other programs.
The installation progress screen looks like this:
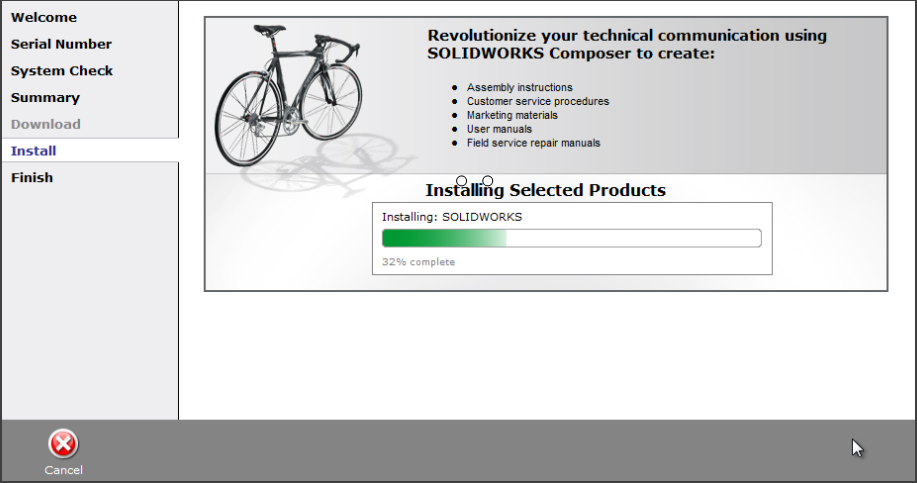
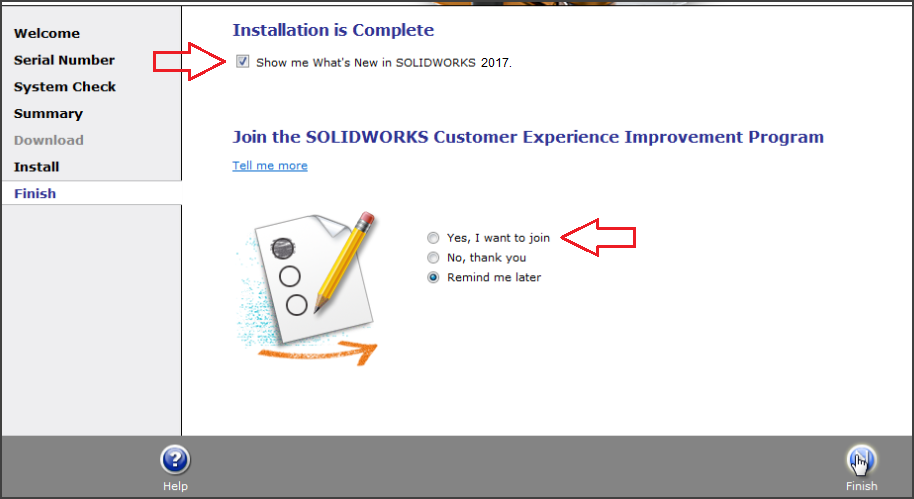
When finished you will be presented with the INSTALLATION IS COMPLETE screen. You may (OPTIONALLY) choose to view the “What’s New” PDF and participate in the customer experience improvement program:
When finished with the installation, you should REBOOT.
I made an older video that shows the installation process of SOLIDWORKS 2013 and covers many of these steps.
You should now have a FULL CLEAN installation of SOLIDWORKS 2017.
After the installation is complete
REQUIRED – ACTIVATION:
After the installation is complete, any stand-alone user will be required to ACTIVATE the software. This process will begin automatically on the first launch of SOLIDWORKS. It only takes a few moments, and essentially involves entering an email address and clicking next, next, finish. The activation process ties the serial number to the hard drive of the computer, and if the computer is ever decommissioned, the serial number first must be de-activated so that it can be used on the new machine.
OPTIONAL:
Here are some things to consider, after the installation is complete.
- Update your engineering database (your SW files)
All of your files are now in file format from an “Older” version of the software. SOLIDWORKS files take longer to open, the first time they are converted from an “Older” version file format. Consider making a plan to get all of your files up to the latest version of the software, using the built in “Conversion Wizard” utility. With this tool you can point to one folder to convert all of the files in this folder (and sub-folders) into the 2017 file format. Typically this is done overnight or over a weekend.
This update is especially important for PDM users and should be considered mandatory.
- Clear your registry
Last year I posted a video on the topic of SOLIDWORKS REGISTRY. In this video, I explain that migrating settings from an older version of SOLIDWORKS could have a negative impact on the registry, and could possibly cause instabilities in the software. Here is a link to this video. - Organize your “Team” libraries
Your templates for Part/Assemblies/Drawings, your BOM Layouts, your Title Blocks, your Revision Tables, your customized Hole Wizard and Toolbox settings – these library type items should be reviewed and updated each year. Ideally, one person on the team takes the role of “Library Manager” and this person has one backup person, in the event that they are absent. This person should take on the role of updating the libraries and helping the team point to these updated library locations, so that everyone is working from the same standard.
Congratulations! You should now have a clean and working installation of SOLIDWORKS 2017. If there are any questions/comments on this tech tip, please contact the Fisher Unitech SOLIDWORKS technical support team.
Related Articles
Simulation Tip: Animating Transient Results in SOLIDWORKS Flow 2017
Two Great Tools Every SOLIDWORKS Users Should Know (But Many Don’t)
SOLIDWORKS Simulation Tech Tip: Flow Solver Scalability
“Feet & Inch” Unit Display Defined in SOLIDWORKS
Revisting FETCH and the SOLIDWORKS 2017 Design Contest
Top New SOLIDWORKS 2017 Enhancements
About the Author
Toby Schnaars began using the SOLIDWORKS Software on the ’98 plus release, in October of 1998. He began working for Prism Engineering (now Fisher Unitech) as an instructor and tech support engineering in 2001. He has fielded over 10,000 tech support cases and been the head instructor for over 200 SOLIDWORKS training classes.
Toby is a regular presenter at users groups, technical summits, and SOLIDWORKS world. In 2003, in Orlando, FL, Toby won first place in SOLIDWORKS MODEL MANIA – a modeling contest based on speed and accuracy.
Toby hosts a free monthly webinar called “Toby’s Tech Talk” where you can tune in and get more tips and tricks on the SOLIDWORKS software.

 Blog
Blog