SOLIDWORKS 2017 What’s New: Rollbacks Now Include Their References – #SW2017
Rollbacks Now Include Their References
Rollbacks, what are they all about? Rolling back a file in SOLIDWORKS PDM is often a last resort for returning a file to a previous state or version (and I’d like to add that I always recommend against using it, as most the time you can check a file out, get a previous version, then overwrite the current version with the older version).
Now, with all that said, one of the biggest pains can be rolling back individual files because their references can become all sorts of jumbled, and you’ll have version mismatches here and there, and it becomes a real headache, really quick. Have no fear though! With SOLIDWORKS PDM 2017, they have added the ability to rollback a file with its references!
No more headaches with mismatched versions due to rollbacks, also you can now roll back more than one file at once! You can roll back a parent file AND its children, and also files that have been indicated as sub-parents (see blog about Reference Tree Enhancements for more information about sub-parents), to a previous built state. On top of that, you can select where each reference will roll back to as well, so you can skip down even further down their history if you need to.
Once the rollback is complete, SOLIDWORKS PDM resets the referenced configurations of the files. Note that if the same configuration is available in the target version, PDM will retain the references for that configuration. Also, if the same configuration is not available in the target version, the references are redirected to the last active (aka last saved) configuration of the target version. (Side note: unfortunately, if you’re using items in the PDM, this is not supported yet. If you don’t know what items are in PDM, don’t worry about this)
Rolling Back a File Structure – So what’s it look like?
To roll back a file structure:
- Open History
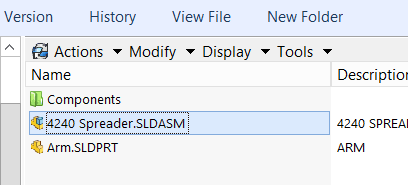
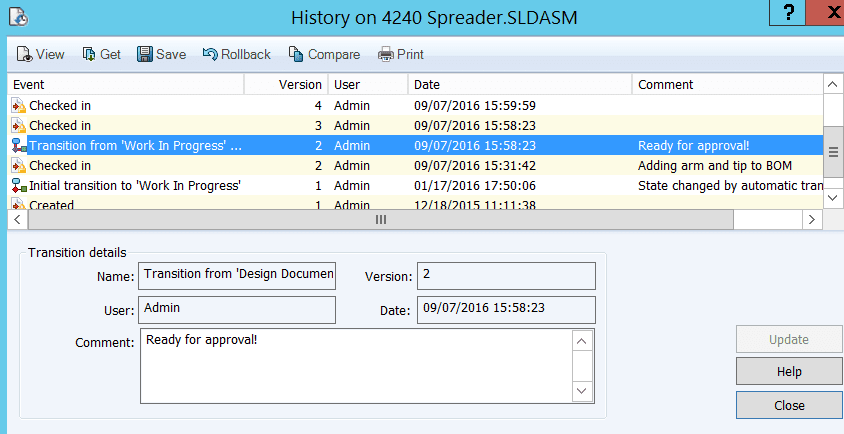
- In the History dialog box, select the version to roll back to and click Rollback.
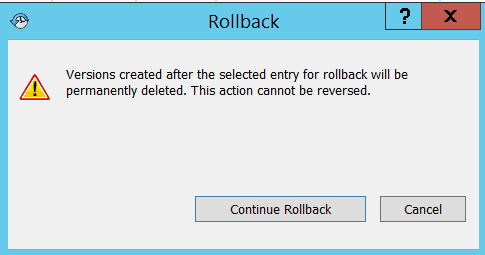
- Click Continue Rollback.
- In the Rollback dialog box, select the files to roll back.
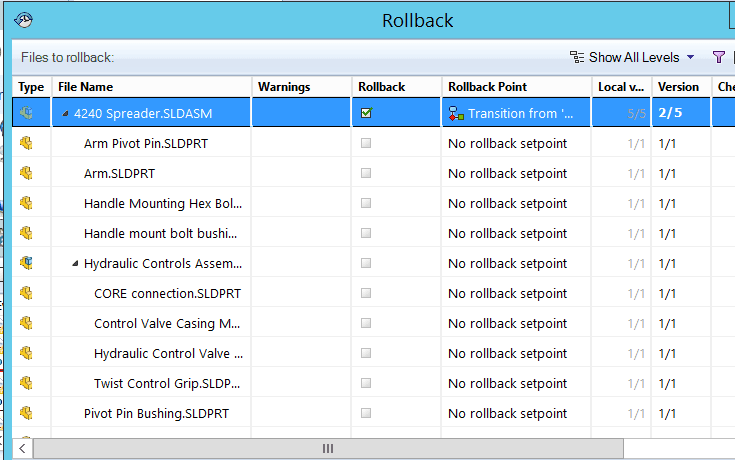
- For Rollback Point, select the valid event.
- Ensure that Yes is selected for Redirect parent references of the file to be rolled back to redirect the references.
- For Rollback Comments, type a comment.
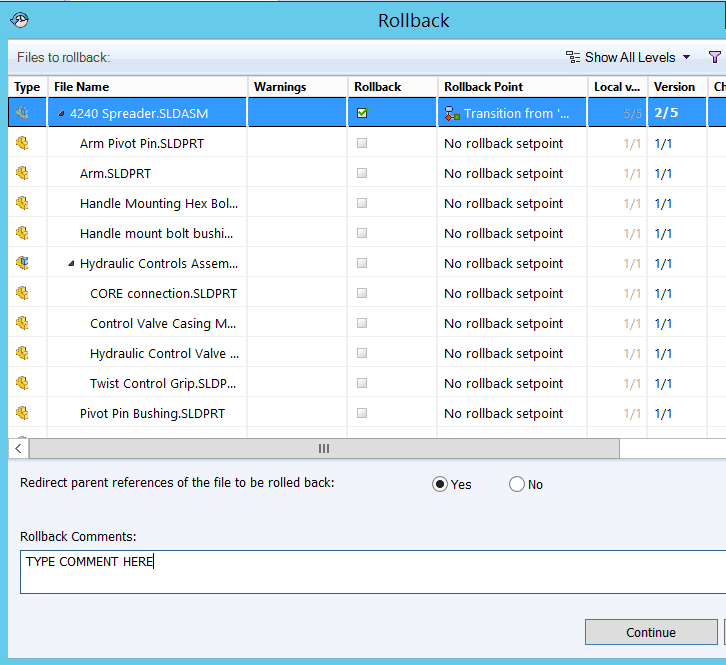
- Click Continue.
The list of the referencing files for which the references are redirected or deleted appears.
Looking at the rollback dialogue box, you’ll see several icons, here’s a key to help you sort them all out:
 |
Next Warning / Previous
Warning |
These icons only pop up when there are warnings present in the ‘Warnings’ column. In the File list, you can sort it by warnings, or focus to the next file with warning or the previous file with a warning. It’s a quick way to find where you might need to correct some things. |
 |
Show All Levels | This dropdown menu displays file references for the entire file hierarchy when you select Show All Levels, or just the top level of the file hierarchy (Top Level Only). |
 |
Select Files | Opens the ‘Select Files’ dialog box, where you can specify a wildcard pattern to select files. |
 |
Open File List | Open All opens up Microsoft Excel and lists the files as a comma-delimited file in that
Excel Spreadsheet. Open Visible opens a list of visible files in Excel in the same manner |
 |
Save File List | Export All exports the list of all the files as a comma-delimited .txt file
Export Visible exports the list of visible files in the same way. |
Inside the “Files to Rollback” portion of the dialog box, you’ll see the following.

- Type – Displays a thumbnail preview of the file when you hover over the icon
- File Name – Displays the file to roll back, and its referenced files if it has any.
- Warnings – Shows you the warnings that may be present with the rollback you’re about to complete
- Rollback – The checkbox’s let you select exactly which files you’re going to rollback. With no warnings, the default setting is to have the original file you wanted to rollback selected by default, and you can then continue to select more from there.
- Rollback Point – This lets you select a valid event in the history of the target version, only if you select the rollback checkbox. It will say “No rollback point” if the rollback is clear.
- Local Ver. – This shows you what the local version and the latest version of the file, using this format “Local version/Latest Version”
- Version – Displays the referenced version/latest version of the file. (Note: the file is rolled back from the latest version to the referenced version)
- Checked Out By – Shows you which user has checked out that file. This will be blank if it’s not checked out
- Checked Out In – Shows you the computer the file is checked out on. It will read blank if it’s not checked out.
- Found in – This shows you the folder path where the file is located in the vault
- State – Tells you what state the file is currently in
- Redirect parent references of the file to be rolled back

Yes – This is the default setting, this redirects the parent references of the rolled back versions
No – This deletes the parent references of the rolled back versions.
Rollback Comments – Allows you to comment in the history about the rollback (Highly recommended!!!)

Continue – Selecting this will finish the rollback
Cancel – Selecting this will cancel the rollback

I hope this part of the What’s New series gives you a better understanding of the new features and functions of SOLIDWORKS 2017. Please check back to the CATI Blog as the CATI and MCAD Support Teams will continue to break down many of the new items in SOLIDWORKS 2017. All of these articles will be stored in the category of “SOLIDWORKS What’s New.” You can also learn more about SOLIDWORKS 2017 by clicking on the image below to register for one of CATI’s or CATI’s Design Summits.
Charley McGowan
InFlow Support Team
Computer Aided Technology

 Blog
Blog